# ETC Eos

> Documentation about the ETC Eos integration.

---

Site [llms.txt](/llms.txt)

---

**This integration has been tested on software version 3.3.9. I can not guarantee any level of
support for older software versions, and future updates are only guaranteed to support the latest
console software at the time of release.**

## Board setup

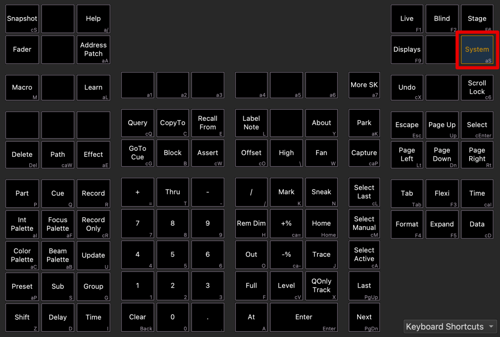
First, open the system settings.

<figure class="card rounded p-2 td-post-card mb-4 mt-4" style="max-width: 510px">
<img class="card-img-top" src="/docs/etc-eos/ETCEosKeypadSystemButton_hu_5dc3469e2b853b93.png" width="500" height="337">
<figcaption class="card-body px-0 pt-2 pb-0">
<p class="card-text">


Click the **\[System\]** key to open the system settings. This is a screenshot of ETCNomad, but this
key should be in the same spot on a physical console.
</p>
</figcaption>
</figure>


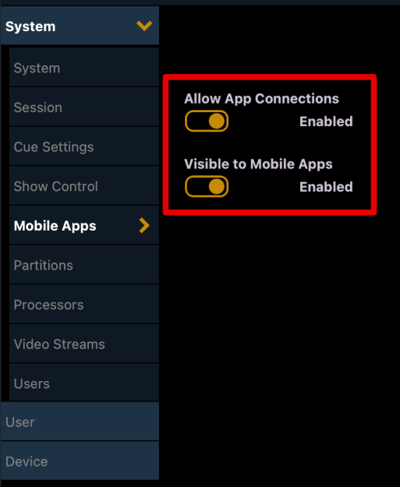
Then, navigate to **System > Mobile Apps**. Here, you need to enable both **Allow App Connections**
and **Visible to Mobile Apps**.

<figure class="card rounded p-2 td-post-card mb-4 mt-4" style="max-width: 410px">
<img class="card-img-top" src="/docs/etc-eos/ETCEosMobileAppsConfigScreen_hu_657d121f56e1da18.png" width="400" height="487">
<figcaption class="card-body px-0 pt-2 pb-0">
<p class="card-text">


Enable both of these switches. You may leave **Visible to Mobile Apps** turned off if you don't want
auto-discovery.
</p>
</figcaption>
</figure>


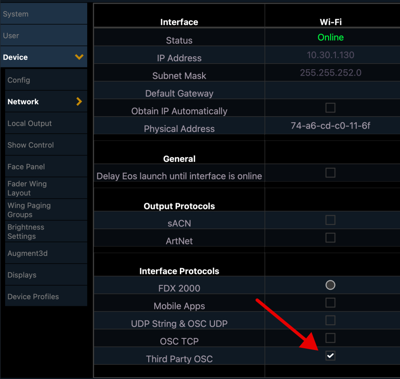
Then, you need to enable OSC. To do so, navigate to **Device > Network**, and enable **Third Party
OSC**.

<figure class="card rounded p-2 td-post-card mb-4 mt-4" style="max-width: 410px">
<img class="card-img-top" src="/docs/etc-eos/ETCEosNetworkConfigScreenThirdPartyOSC_hu_d610fd58d9410458.png" width="400" height="379">
<figcaption class="card-body px-0 pt-2 pb-0">
<p class="card-text">


Enable the **Third Party OSC** checkbox on the active interface. You can leave all the other
checkboxes here set to whatever you need for your show, none of those will affect this app.
</p>
</figcaption>
</figure>


And that's it! The board should be configured the way it needs to be for the app to connect now, no
need for any Show Control configuration or anything else.

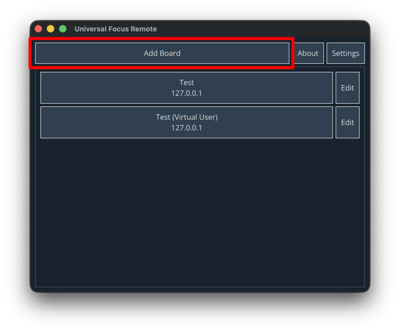
Now, on the app side, click on **Add Board**.

<figure class="card rounded p-2 td-post-card mb-4 mt-4" style="max-width: 410px">
<img class="card-img-top" src="/docs/etc-eos/UFRMainPageAddBoardButton_hu_137fda54210db828.png" width="400" height="332">
<figcaption class="card-body px-0 pt-2 pb-0">
<p class="card-text">


</p>
</figcaption>
</figure>


Then, you should see your board in the list of discovered boards! If you do, great! Just go ahead
and click on that, give it a name, and you should be able to connect right up! If you don't (which
is not uncommon to happen in corporate networks where multicast traffic is restricted), then follow
the steps below.

## Manual connection

First, follow the steps above to set up the board.

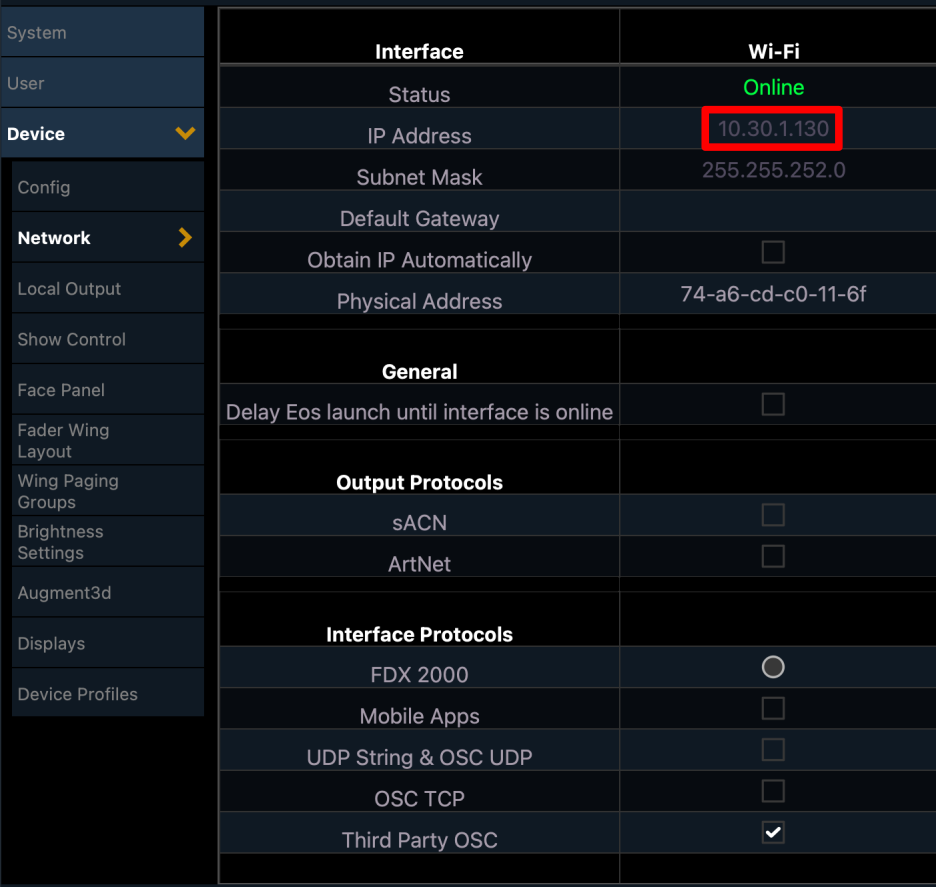
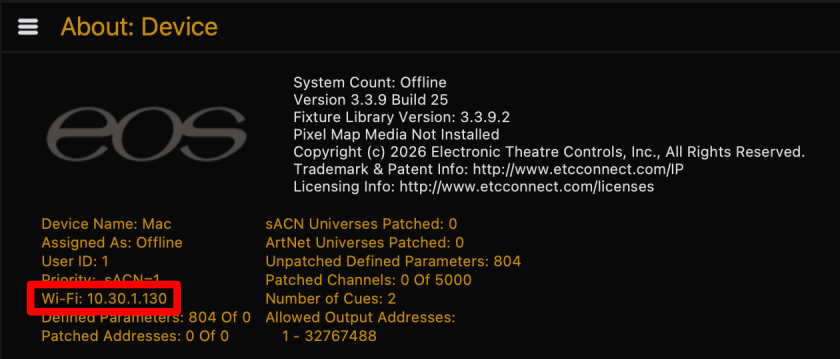
To manually connect, you first will need the board's IP address. This can be found both in the
network configuration screen and the CIA About page.

<div class="td-card-group card-group p-0 mb-4">
<div class="td-card card border me-4">
<div class="card-header">
      Network Configuration Screen
    </div>
<div class="card-body">
    <p class="card-text">
        <p><img src="ETCEosNetworkConfigScreenIPAddress.png" alt=""></p>
</p>
      </div>
  </div>


<div class="td-card card border me-4">
<div class="card-header">
      CIA About Page
    </div>
<div class="card-body">
    <p class="card-text">
        <p><img src="ETCEosAboutPageIPAddress.png" alt="">
This page can be accessed by clicking the <strong>[About]</strong> key on the console.</p>
</p>
      </div>
  </div>

</div>


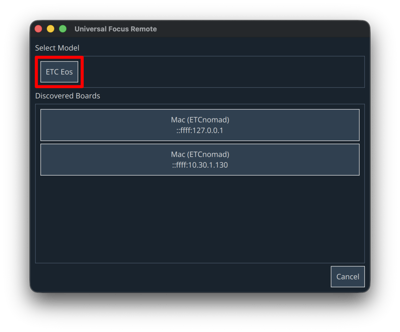
Now, in the app, click the **ETC Eos** button.

<figure class="card rounded p-2 td-post-card mb-4 mt-4" style="max-width: 410px">
<img class="card-img-top" src="/docs/etc-eos/UFRAddBoardPageModelButton_hu_904ec8912cfc2939.png" width="400" height="332">
<figcaption class="card-body px-0 pt-2 pb-0">
<p class="card-text">


</p>
</figcaption>
</figure>


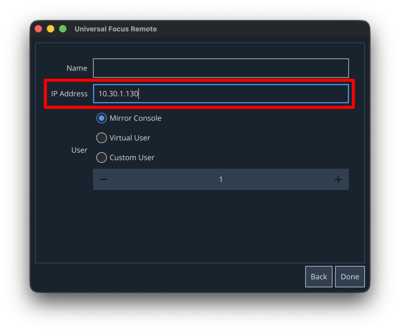
Then, on the configuration screen which that brings you to, enter the IP address from before, and
set the other settings to what you want.

<figure class="card rounded p-2 td-post-card mb-4 mt-4" style="max-width: 410px">
<img class="card-img-top" src="/docs/etc-eos/UFRBoardSettingsPageIPAddress_hu_4ed89ee75fb1ac9f.png" width="400" height="332">
<figcaption class="card-body px-0 pt-2 pb-0">
<p class="card-text">


</p>
</figcaption>
</figure>


Once you confirm, you should be able to select the board from the list to connect to it!

## Configuration options

This board is pretty simple configuration-wise, thanks to the simplified networking setup that ETC
has enabled. These are the configuration options available.

### IP Address

This is just the IP address of the board to connect to.

### User

This allows you to select the console user you would like to connect as. The options are described
in the table below.

| Option         | Description |
|:-------------- |:----------- |
| Mirror Console | This option automatically selects the same user that is selected on the console. |
| Virtual User   | This option selects a virtual user who will have a completely independent command line from any console users. |
| Custom User    | This option allows you to enter a custom user number to connect as. |